by
by Spis treści
At the time the original article was published, 200128 was the most recent Maniacs Patch version. Some functionalities may have changed since then and therefore parts of the tutorial may not be 100% accurate.
Welcome back to another part of the tutorial on Maniacs Patch. The previous one was a very technical overview and you could easily get lost in it all (it only gets better now!). This time we will focus on the event commands that didn’t exist before. Thanks to them, you can attain a level of control over the game you’ve never had before. For a couple of them I’ll provide some tips and tricks as they turned out to be not-so-obvious to use.
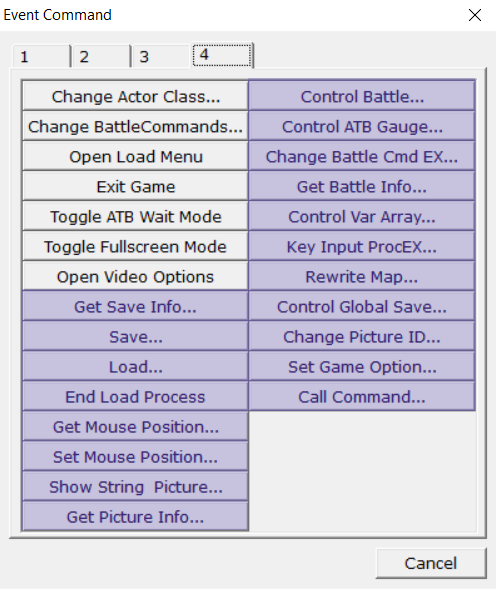
Get Save Info

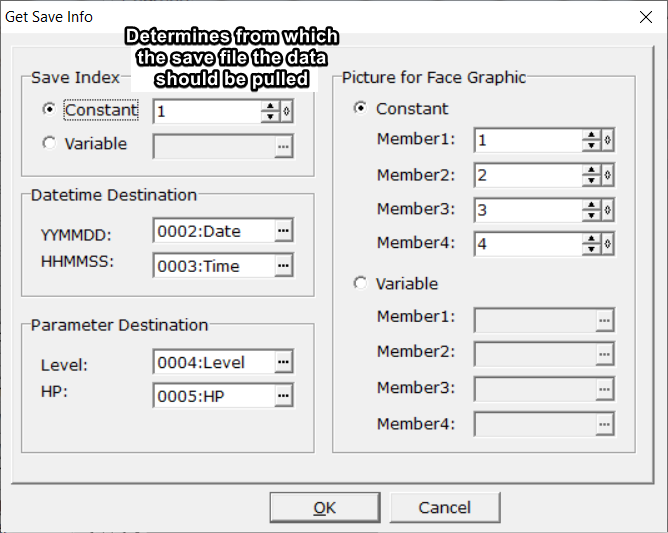
This command allows for retrieving all the data seen in the game’s save/load screen – except the hero’s name. You can freely specify all the variables the specific data will be sent to. The Picture for Face Graphics field allows for assigning pictures in which the face graphics should be displayed. Alright, I’ve called the command inside an event but why does it display some face in the upper-left corner of the screen!!!????
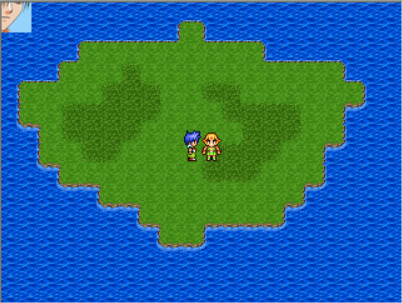
Let me explain – the command apparently automatically calls Show Picture at position 0, 0 of the screen. Images in 2k3 are displayed relative to the center, so that’s why only the bottom right part of the picture can be seen. What is more, pictures with higher IDs cover the lower ones, which is why only the face (well, part of) of the last character in the save file is shown. Now to avoid showing all those faces to the player, all you need to do is call Show Picture for pictures 1, 2, 3 and 4 with a dummy image and Transparency set to 100% (the rest of the parameters doesn’t matter) or Move Picture for pictures 1, 2, 3 and 4 with 100% Transparency. Conversely, if you want to show them in some more meaningful place, just analogously call Show or Move Picture with appropriate parameters BEFORE calling Get Save Info.
Save

A simple but powerful command, it forces the game to save (shocking) We select the slot 1-15 on which the save should take place, and optionally we can assign to some variable information about whether the Save succeeded or failed (1 in case of success, 0 otherwise). Note: this command works regardless of whether Change Save Access is set to Disable or Enable. Using this command is pretty much invisible to the player, so it can be safely used to create an autosave system, for example.
Load
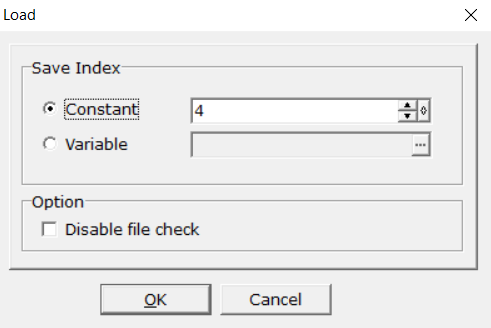
Very straightforward – simply forces the game to load a given save file. This is pretty noticeable as the screen disappears for a while. If the selected file does not exist, the command is ignored… unless the Disable File Check option is checked, then, well, expect spooky stuff to happen. Why would you ever do that? As far as I know, it skips some system check which makes the command execute faster, but it’s definitely better not to do that if you’re not 100% sure.
End Load Process
It literally doesn’t do anything (for now)…
Get Mouse Position

Another straightforward function, the mouse position is saved to selected variables. It provides a very easy way to make an in-game cursor or even a full-blown point&click adventure game.
Set Mouse Position
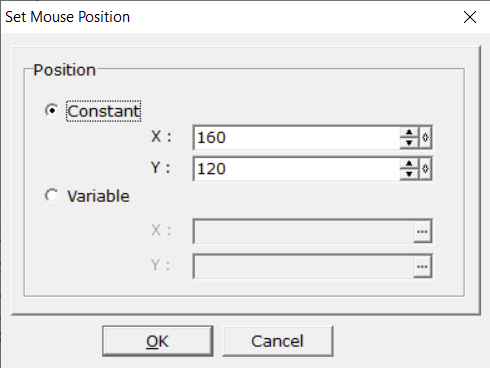
Likewise, not too much to speak about. The position of the mouse is set relative to the upper left corner of the game window (the given 160, 120 coordinates will always set the mouse to the center of the window).
Show String Picture

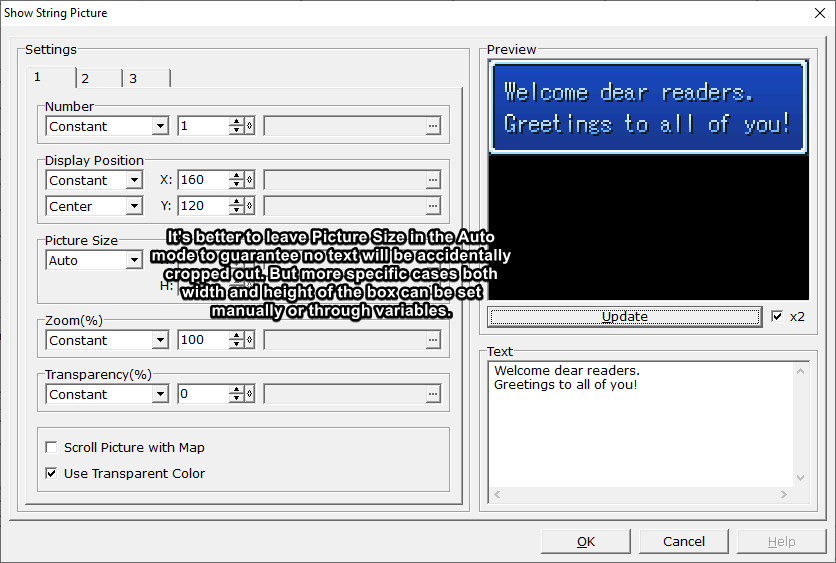
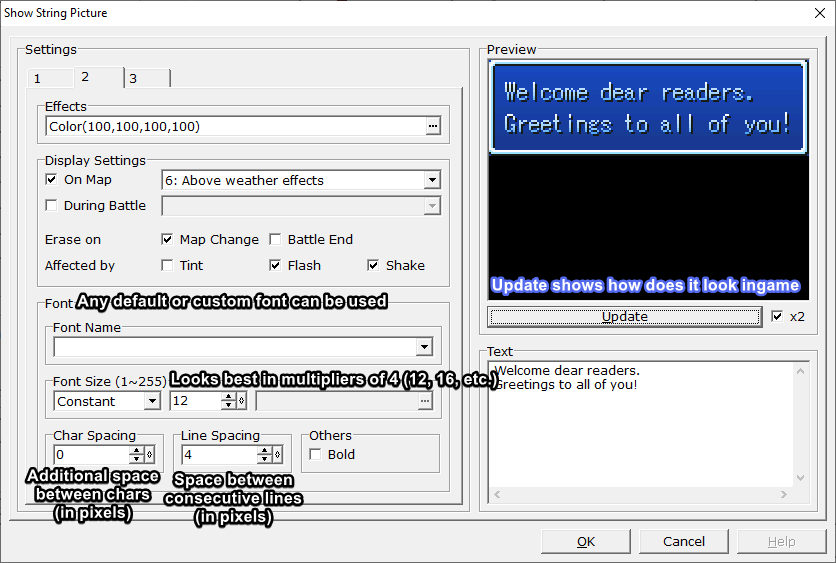
An absolute godsend for anybody making custom menus. If you ever tried making one then you’re definitely familiar with all the pains that came with creating such system – handcrafting tens if not hundreds of pictures for every single case. Thanks to this marvelous command it’s no longer needed – all the pictures are automatically generated, you only need to provide the text to be displayed. With enough determination even a custom message system with textboxes above character’s heads is very much feasible.
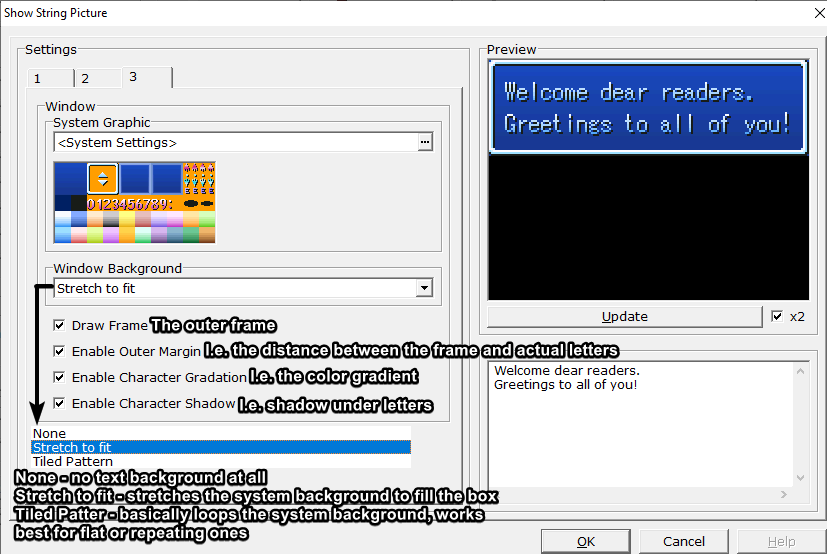
Get Picture Info
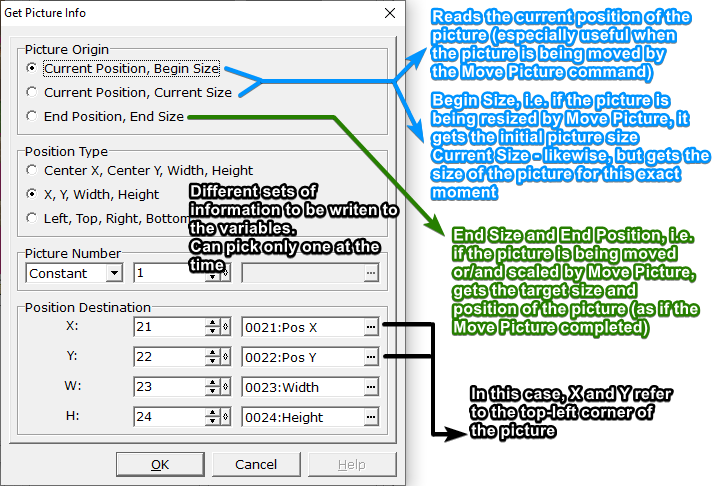
Just like the name suggests, it saves some information about a picture to the given variables.
Control Battle
[Due to spotty documentation and notorious quirks of 2k3’s code, playing with this feature might inflict irreversible mental damage. You have been warned!]
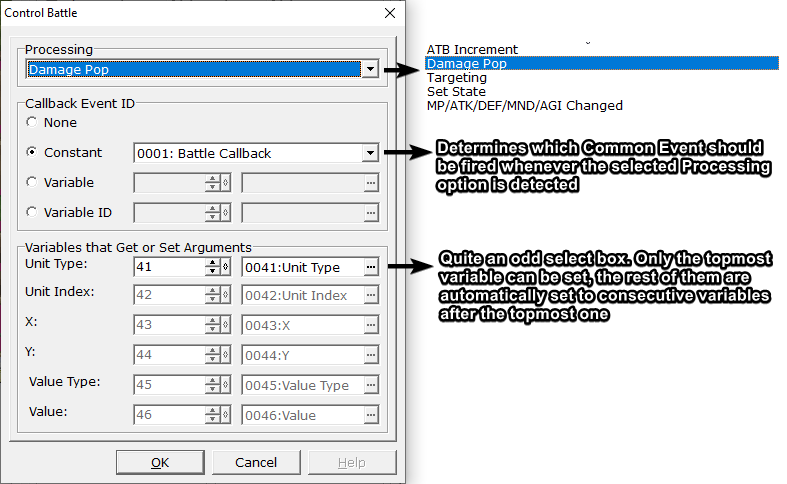
This command alters the flow of the battle when called during one. It’s recommended to use in conjunction with a Common Event set to the new Begin Battle trigger.

There are 5 options to choose from:
ATB Increment – the selected Common Event will be triggered during the battle whenever the ATB bar of one of heroes has changes.
Information returned:
- Unit Type – character type (0 – hero, 1 – enemy).
- Unit Index – index of the hero inside the party (counted from 0)
- Current Gauge – the current value of the ATB bar
- Gauge Increase – by how much the ATB bar has increased
Damage Pop – event triggered when damage is taken by either a hero or an enemy.
- Unit Type – 0 for heroes, 1 for enemies.
- Unit Index – index of the damaged hero/enemy
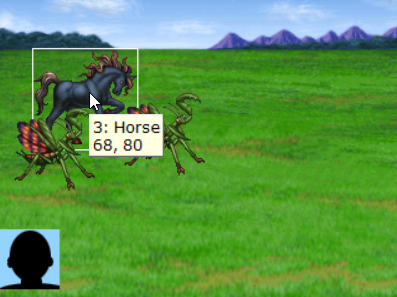
This one might be confusing since the index for enemies is starts from 0, not from 1 like it does in the Troops database window! Always remember to subtract 1.
- X, Y – the coordinates at which the damage numbers are shown
- Value Type – I admit I haven’t been able to fully figure this parameter out. It takes 0 for normal attacks, magical attacks, abilities and critical hits, and 2 for attacks that were dodged. Who knows under what circumstances Value Type is equal to 1 (and whether such case exists at all)
- Value – the amount of damage received
Targeting – triggered when some object is taken as a target. I won’t elaborate on what all the Action Indexes mean since there are way too many of them.
User Type and User Index refer the action performer and likewise Target Type and Target refer to the action’s receiver. Action Type determines the type of action, 0 for basic actions and 1 for skills. Action Index determines the Skill Index for Action Type 1, and for basic actions this is what I’ve been able to figure out:
- Action Index 0 – normal attack
- Action Index 1 – double attack
- Action Index 2 – defense
Oddly enough, User Type and Target Type work differently for this exact option, that is, they don’t take 0 for heroes and 1 for enemies.
Set State – triggers whenever the state of a hero/an enemy changes. User Index and User Type, unlike what the names might suggest, refer only to the target, not to the unit that caused the state change. Another strange thing is the State ID – in theory it should return the state ID from the database, but during my tests it always returned 1 (which is the death state ID).
MP/ATK/DEF/MND/AGI Changed – this one works very similarly to Damage Pop, the only difference is that it triggers on MP damage or any other stat change listed, rather than on HP damage.
P.S. I didn’t really test this feature very extensively and yet I still came across a couple of very controversial edge cases. E.g. if the target of some attack dies, the returned information about the target may be just complete gibberish. I guess it’s better to stay away from this feature for the sake of your mental health. Only for hardcore nerds who really want to pimp up the default battle system.
Change Battle Command Ex
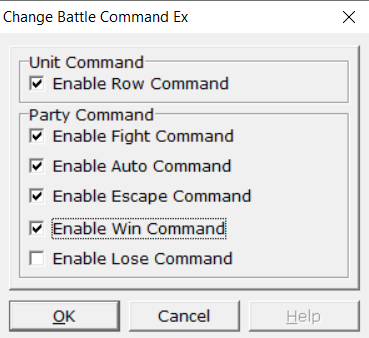
Allows for activating/deactivating specific options to choose from in the combat menu. It works only during combat, so calling it directly on the map before an encounter has no effect.
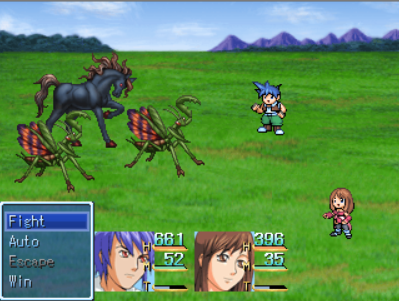
Even instant Win/Lose buttons can be added, which may be useful for testing purposes.
Get Battle Info
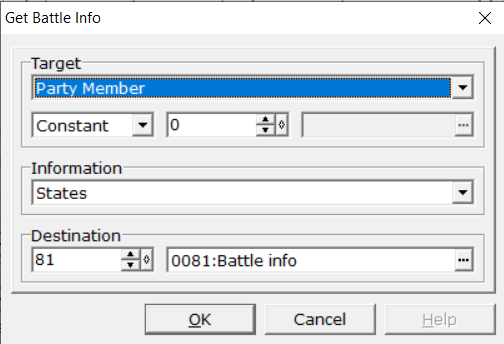
A command that returns an array of data (more details in the next paragraph) for the selected type of in-battle information. The list includes various parameters like:
- character buffs/debuffs
- all the states the characters is being affected by (0 or 1 for each state in the database)
- elemental resistances
- screen X/Y of the character
- is the character in defending state
- is the character able to act
…and so on.
Control Var Array
To use this command properly, first you need to know what an „array” in RPG Maker is.
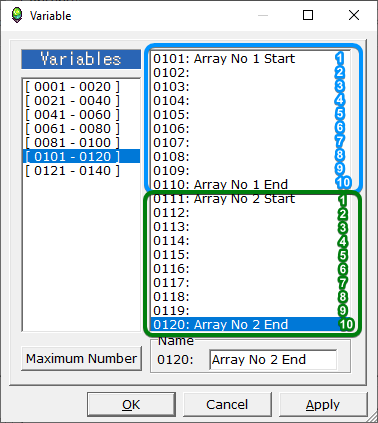
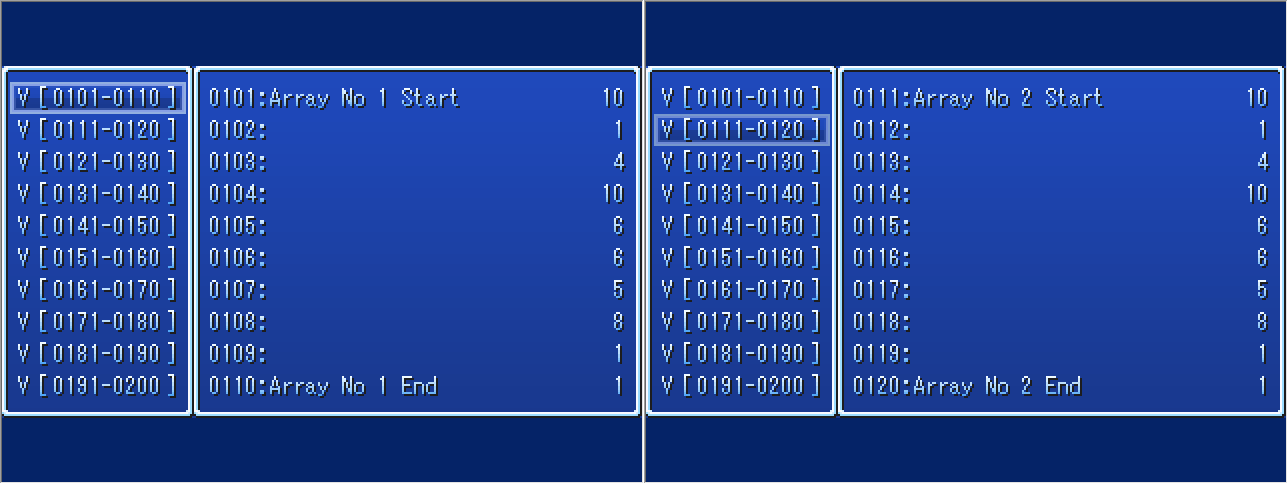
To put it simply, an array is a set of neighboring variables. In the example given, there’s an Array No. 1 with the size of ten (variables), indexing from 101 to 110. Arrays are very useful when you want to create a container for information of the same type. A good example would be if you had ten enemies on the map and then the array would store ten values for their HP.

So, using Control Var Array means that the operation is performed on the entire array at once (in this case Copy – copies the contents from one array to another). Target 1 specifies the variable from which Array No. 1 starts and likewise Target 2 specifies the variable from which Array No. 2 starts. Size is simply the size of both arrays.

The sample event commands shown above firstly fill the Array No. 1 with random values and then copy all of them to the Array No. 2 using the Copy operation. The result should look similarly to this:
In addition to regular mathematical operations, we can perform more interesting stuff such as:
- Shuffle – randomizes the order of values in the array, can be useful, for example, when shuffling the deck for a cards minigame
- Enumeration – fills the array with consecutive numbers according to a given rule
- Sort (Ascending/Descending) – sorts all the values in an array from lowest to highest (ascending) or from highest to lowest (descending)
- Swap – swaps values of boths arrays
Key Input Processing EX
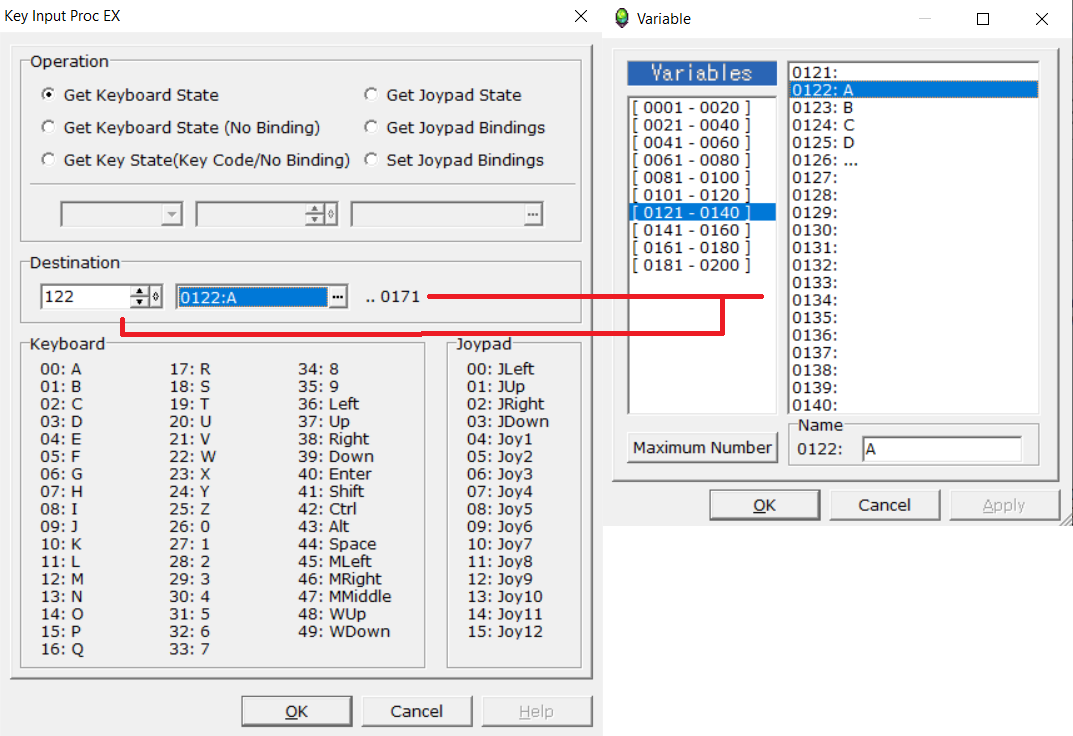
The basic Key Input Processing function sets the selected variable to the code of the key pressed. This command however sets whooping 50 variables to 0 or 1 depending on whether the key is being pressed (0 – not pressed, 1 – pressed). Very useful for checking multiple simultaneous key presses. It’s a good idea to name all 50 variables with the corresponding key names, so that you don’t have to pull up this command’s cheat sheet constantly. To use Key Input Processing EX you just need to set the start of the array where all the key states will be dumped to. As you can see it also handles Joypad buttons in addition to keyboard keys.
Rewrite Map
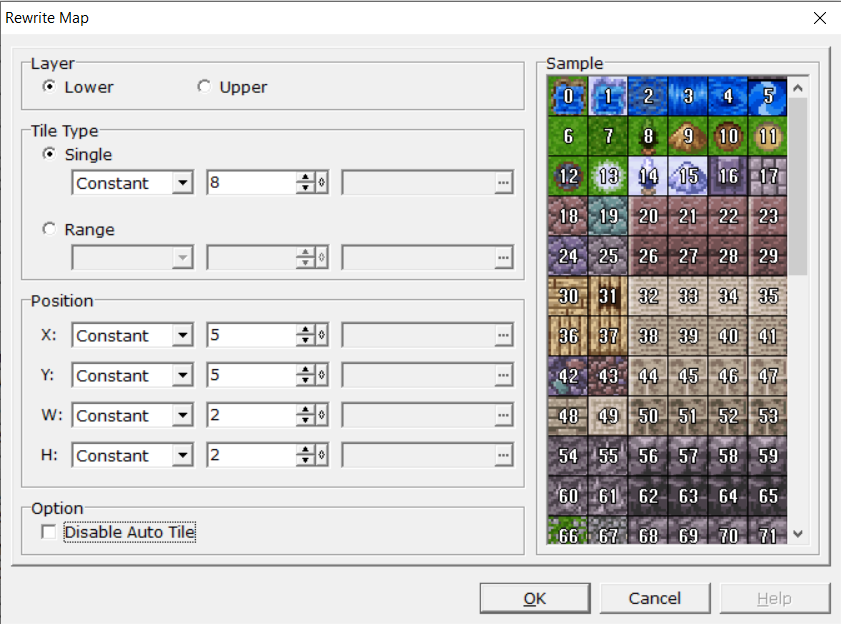
Ever wanted to dynamically change parts of the map during the game? Now you can! A single command call can operate only on single layer – either top or bottom. Tiles on the right are numbered consecutively with unique IDs. Tile Type specifies the tile(s) to be swapped to. Single means that the entire area indicated in Position will be filled with a single tile type. Can be set both manually or by a variable.

Range points to an array of variables and each successive variable in this array points to a tile type.
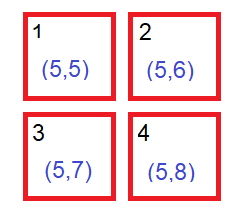
Here’s an example for Range set to the first variable and Position X = 5, Y = 5, W = 2, H = 2.
The 2×2 square will be filled with the values from the array. The top-left corner of the square will be filled with a tile whose ID is stored in variable No. 1. The top-right corner – variable No. 2. The bottom-left corner – variable No. 3 and the bottom-right corner – variable No. 4. Another example – if we had changed the properties to, let’s say, W = 3 and H = 2 then it would need a set of 6 variables.
X and Y point to the top-left corner of the area. There’s also an option to disable autotiles for the redrawn area.
Change Picture ID

Usually if you wanted to reverse the drawing order of the pictures (that is, which one covers the other), you’d have to use two Show Pictures commands with picture IDs swapped. But now there’s a Change Picture ID command that solves this exact problem and is able to change the IDs of pictures at will. The function provides three ways to do so.
Move simply changes the picture ID of Target 1 to Target 2. If a picture with ID of Target 2 already exists, it’s erased and all its data gets overwritten. Swap, well, swaps the picture IDs of Target 1 and Target 2 without losing any data. Slide moves the image by a negative (down) or positive (up) value and the images through which it moves will have their numbers shifted in the opposite direction by the Size value. Interestingly, in the Size field we can specify a value greater than 1. In such a case all these operations will be performed on arrays of images.
For example, let’s use Move with following parameters:
- Target 1: 1
- Target 2: 3
- Size: 2
This way picture no. 1 will get moved to postion 3 and likewise picture no. 2 will get moved to position 4. One may wonder what happens when Size is larger than the difference between Target 1 and Target 2. Well, let me explain on an example: suppose we have a similar scenario but with Size set to 3. First, the command will take all 3 pictures, that is Target 1, Target 1 +1 and Target 1 + 2, and *then* move them onto Target 2, Target 2 + 1 and Target 2 + 2. So no need to worry about it working sequentially, it does it all once. If it did, then weird stuff like moving Target 1 to Target 2 and that changed Target 2 to Target 2 +2 would happen.
And the last option – Ignore out of range error. Such error happens when you accidentally assign a negative number to a picture – the game will just crash and burn. Checking this option means that the game will ignore this error to continue running and the all the pictures with out of range IDs will simply vanish.
Keep in mind that this command only swaps picture numbers, not the pictures themselves. All information about a given image, such as its position, transparency, etc. is retained.
Set Game Option
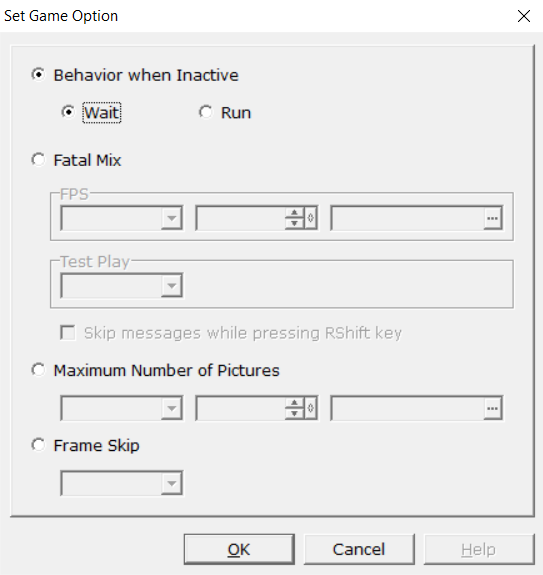
Allows for configuring specific behaviors of the game engine. Behavior When Inactive determines how our game should behave when the game window is out of focus. When it’s set to Wait, the game freezes until focus is restored. Active makes the game continue to run normally. It can be used as a some kind of protection against cheating, e.g. in time gated puzzle segments.
Fatal Mix – determines the FPS limit of the game. You can also give the player the option to fast-forward messages with the Shift key, just like in test mode.
Maximum number of pictures – changes the default limit (1000) of pictures.
Frame Skip – what % of frames the game should skip displaying.
Control Global Save
This is without a doubt one of the most interesting options added in Maniacs Patch. It allows you to save any variables/switches to a file and access them regardless of whether the game was loaded from a save file or started from the beginning. The important thing is that all the Global Save data is stored in the Save.lsd file, so if the user decides to delete it for whatever reason some really funky stuff may happen. There are ways to check for the file’s existence, for example: prior to the game release, write some data at an arbitrary variable to the Global Save and then try to read it at the runtime, if the value is equal to 0, then the file was most probably deleted or at least tampered with.
An example use case might be some kind of an achievement system that is global and independent of save slots. Perhaps the more advanced developers could leverage this option to make a whole new custom saving system without using the standard save/load features at all.
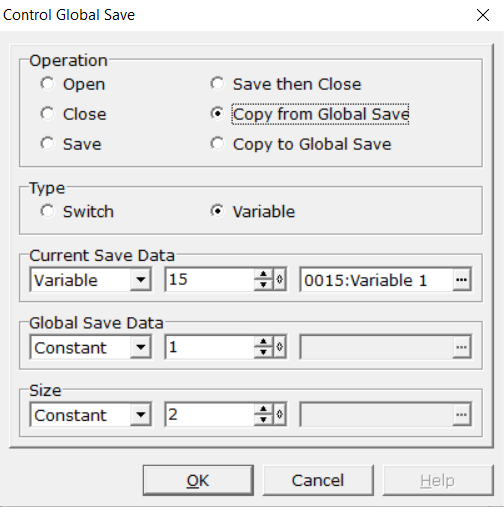
This is how the global save and load window looks like.
There are 6 operations available:
- Open – opens the Save.lsd file
- Close – closes the Save.lsd file. For those who have never operated on save files: this option in no way deletes the file, it only removes the handle to it, a sort of binding between the file and the program, and the program can no longer read from it. One may wonder why the file could not be open all the time. The answer is that the file is likely to be corrupted if it is not closed properly.
- Save – saves the state of the file.
- Save Then Close – saves the state of the file and closes it.
- Copy From Global Save – reads the selected switch/variable/group of switches or variables to in-game variables.
- Copy To Global Save – writes the selected switch/variable/group of switches or variables to file.
Type – specifies whether all the operations are performed on variables or switches.
Current Save Data – indicates the switch/variable you want to read/write.
Global Save Data – indicates the slot where the data in the Save.lsd file is saved. Each slot holds one variable or switch.
Size – if you want to read or write a group of variables/switches placed next to each other (so, an array) then it can handled in a single operation rather than multiple ones. The logic behind this is the same as in the Change Picture ID function, i.e. what we point to in Current/Global Save Data is the first element to be read/written, followed by subsequent elements.
That being said, I think proper usage of this command may still not be too obvious, so let’s apply all this on a proper example of saving two and reading two variables.
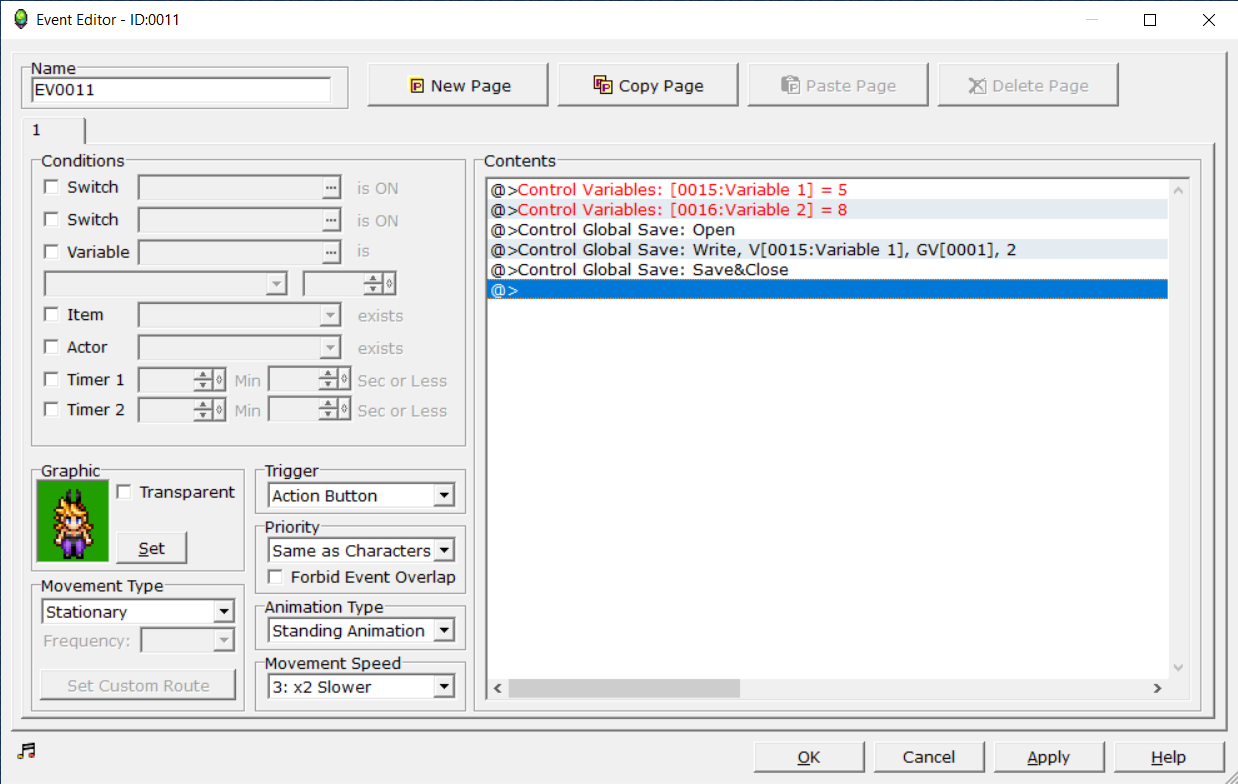
This event is responsible for globally saving two variables numbered 15 and 16. Let’s set those to 5 and 8 respectively.
Then, let’s open the global save using Control Global Save command with Open checked.
After that use the Control Global Save command again but with Copy To Global Save mode and the same configuration as shown in the first picture. Lastly invoke the command yet again but with Save then Close checked.
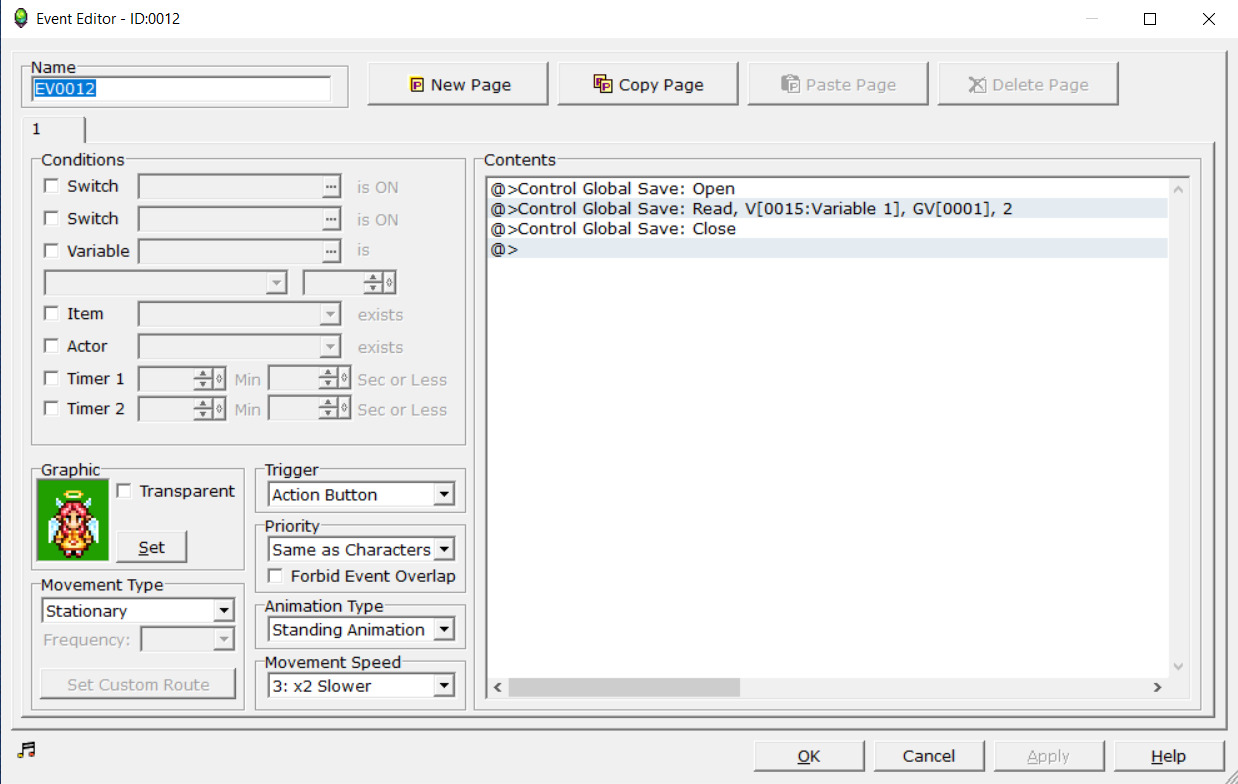
Now let’s handle the loading event.
Call Control Global Save with Open checked. Then call it again but in Copy from Global Save mode as shown below.
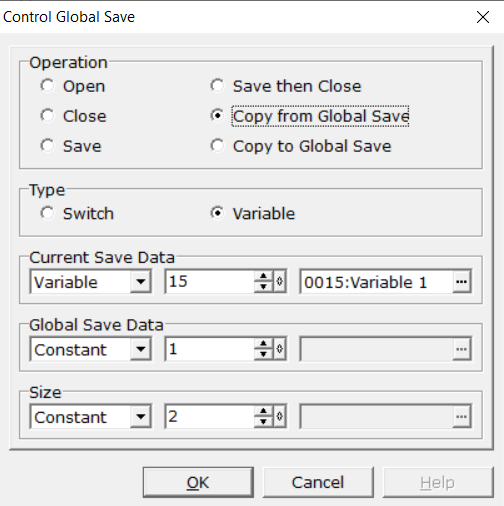
This time there’s no need to call the command with Save or Save then Close option since no variables in the global save were altered. Instead, simply choose Close.
Now when you close the game, open it again and interact with the loading event you’ll be able to see (in test mode’s F9 window) that variables 15 and 16 are set to the values you assigned them earlier, that is 5 and 8 respectively.
Summary
That would be it for the more important features of Maniacs Patch. Hopefully some people will get to use them creatively. Possibly somewhere in the future I’ll write yet another part of the guide showcasing how to build an interesting system leveraging all those features – actually it was supposed to be done by now but some, hmmm, complications arose. Now excuse me as I go back to the basement to work on my own project. Wish me luck and see ya!
Soul
The original article was translated by Axer.